Abstract This manual is intended as a tutorial for the split-screen preferential looking paradigm, covering the running, coding, stimuli creation and set-up. It is only a rough guide, but should be enough to get things started.
This manual is organized from general to specific in terms of the depth of information that one needs to know in order to use the paradigm. Thus, the first two sections would be sufficient for someone who only wanted to run the paradigm, while the later sections get into the highly specific details of stimuli creation and setting up the paradigm from scratch.
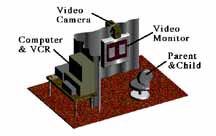
Introduction The split-screen preferential looking paradigm is a highly reliable, precise and cost-effective tool for testing infant language comprehension. In it, two films are presented simultaneously on one video monitor, one film on the left side of the monitor and one film on the right side of the monitor (see Figure 1).
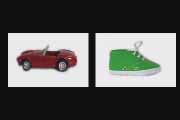
For example, infants might see a car on the left side of the screen and a shoe on the right side while simultaneously hearing an audio track requesting they "look at the shoe!" (See Figure 2.)
Because the stimuli are presented on a single video-monitor, the technological difficulties and expense inherent in synchronizing multiple VCR's, as in previous two screen paradigms, are eliminated. Likewise, this method allows for tight control of other factors related to two monitors, factors like brightness, tint, head position, etc. More importantly, however, the use of a computer to create the stimuli means that this method drastically reduces the need for specialized audio/visual personnel and equipment, provides for much finer temporal synchronization of films and gives the experimenter complete control over all stages of stimuli construction. This procedure also has the added benefit of shortening setup time and dramatically reducing the overall cost of the method.
Coding is similarly enhanced in this paradigm. Previous coding often required specialized timer boards, button boxes, and software that were anything but easy to modify. Further, previous paradigms could only code in real time, relying on the reflexes of the coder to obtain accurate measurements of infant looking. In this paradigm, coding is done with the same set-up and software used to create the stimuli, with frame-by-frame accuracy and any range of coding speeds. Analysis is easily exported to one’s favorite spreadsheet or statistical package.
Finally, the flexible nature of this set-up means that it need not be constrained for use in the study of language. Indeed, the powerful digital editing possible in this paradigm suggests studies in fields ranging from visual perception to social behavior.
Running Running the paradigm requires only a rudimentary knowledge of camcorders and the ability to press two buttons, twice. For clarity, the camcorder that plays the stimuli is referred to as the "player," and the camcorder that records the child is called the "recorder."
WARNING! This should be done within a short span of time. If there is too much time between turning the equipment on and running the study, then the camcorder will automatically turn off. A way to avoid this problem completely is to keep the recorder turned off until bringing the parent and child into the testing room.
Coding using EditDV (Cinestream) NOTE: For Coding off a file on the Computer, see Coder for X or the Coding scripts on the Downloads Page Coding within the paradigm is only slightly more complex than running, and with practice, becomes relatively easy, if boring.
Tips and Tricks. Always make sure the caps lock key is down. For greater speed, consider using the space bar to un-pause the video and roll forward trough inter-trial intervals and particularly long looks. Remember that you can always back up if you miss something. Also, as this tends to be boring, one might consider bringing a CD along to play in the computer (this doesn’t affect coding or computer speed that much and definitely prevents coding induced narcolepsy).
In addition, if one sets the screen resolution to 640X480 (found in the monitors control panel of the apple menu) then one could even code the child using only the computer screen and not the video monitor (see set-up options). This is helpful if coding is to be done in a separate room and video monitors (or space) are scarce.
Troubleshooting. Occasionally, the computer will loose the signal to the camera. You’ll know this has happened if the camera stops responding. If it does, just turn the camera off and on again. This should do it. If that doesn’t work, it may be necessary to quit the EditDV program and come back into it. In extreme cases, you might have to restart the computer and/or plug and unplug the Firewire cable (see set-up section).
Sometimes the monitor portion of the capture window will go black. This could happen for one of two reasons. First, the monitor setting of the computer could be wrong (it needs to be set to thousands or millions of colors.) This can be checked and/or corrected using the monitor control panel located in the control panel section of the apple menu. A second possibility is related to the problem about losing the signal above, and again, turning the camcorder on and off and/or restarting seems to fix this problem.
Closing other open programs, turning off apple share, and/or increasing the memory allocated to EditDV (by using the memory section of the "Get Info" box in the finder) also should help keep these problems at a minimum. On the whole, EditDV is very stable and has never, to my knowledge, crashed our G3.
Analysis The end result of the coding depicted above is a text file that can be easily read by virtually any text editor, spreadsheet program or statistical package. Making sense of this file, however, requires some finesse. First, some background. Back when EditDV was simply a non-linear editing program, and not the super-powered coding machine we see it as now, an EDL file, or Edit Decision List was a handy tool for sharing the arrangement of clips in one’s finalized movie. That is, EditDV’s principle function is to gather video clips together and arrange those clips into a coherent movie. An EDL is simply a text file that lists clip names, original locations (on the coding tape), durations, and their respective locations in one’s finalized movie. For our purposes, only three variables in this list are of interest, each clip’s name, and the beginning and end points (from the original tape). Thus, in the sample EDL (in Figure 8) below, all we care about are the numbers, 34:01:06 and 34:01:07, and the name, "B." This clip happens to be the beginning of the first trial.
001 V C 00:34:01;06 00:34:01;07 01:00:00;00 NOTE: CLIP NAME IS B
If this all sounds complicated, it is. However, if you happen to be using MS Excel, I’ve written a macro that rearranges things to reflect this important data and it also calculates the duration, in frames, of each look. I’ve also conveniently written a macro that calculates the total looking to the right and left before and after some critical point (usually the point at which the auditory stimulus plays). Using these two macros, one can force the data into a more digestible form, from which subject data can be easily culled. So the steps to analysis are:
The first two columns correspond to whether or not a "look shift" has occurred, and how long it took. Thus, an R shift of 13 on trial 1 means that the infant took 13 frames after the onset of the auditory stimulus to shift to the left. Shifts less than 7 frames and longer than 2 seconds (60 frames) are not reported. The last four columns correspond to the total looking time for left and right looks in the salience and test phases of each trial. That is, the salience looks refer to the second (30 frames) before the auditory stimulus plays, while the test numbers refer to the four seconds after it plays. All these numbers are easily changed within the macros and clearly marked).
NOTE: For these macros to work with TimeCode format (used by EditDV) you need to have the TC.xls plug-in installed and active. You can do this by copying the TC.xls file into the Excel add-in’s folder found in the Office folder of the MSOffice Pack.
Stimuli creation Creating the videos for the split-screen paradigm is slightly more difficult than coding, and may take some time to master. However, like learning any new program, this process also becomes streamlined with practice.
In essence, this phase is movie making, pure and simple. Granted, Disney will probably not be calling after completion of your masterpiece, but the essentials of desktop filmmaking all are present. That is, one films the source material, imports it into the computer, edits it into a split-screen movie, and then exports it back to the camera.
In this section, I will cover the specifics of stimuli creation within the EditDV Program (now known as Cinestream). In principle, any non-linear editor will work. This includes Final Cut Pro, Premiere, or even iMovie (as long as you make the splitscreen trials first using QuickTime Pro, see Downloads for a Mask to do this), however the specifics will differ. I will mention a number of tips and tricks to better videos. However, true mastery of this stage, and the unlimited power of desktop video it can unleash, is a personal experience. It is best polished by experimentation, trail and error, and, gulp, even reading the software manual. (The EditDV manual is helpful, if not entirely comprehensive.)
Alternatively, if this method seems to be producing poor audio or video performance, you might try the Export Movie option, and export the product as a DV stream. Then playing/recording the result from the MotoDV software that came with EditDV. This process will take up a large amount of space on the hard drive but puts less strain on the computer when it is transferring the video. You might want to delete the DV stream file after you’re done. Did I mention it’s large?
That’s it, in a nutshell. For more details on the features of EditDV and more explanation of the movie making process please consult the EditDV manual. Note: be careful of both where the files you are saving are going (this is set in the preference menu) and of how many files you have lying around. Digital video files are very large and can quickly fill up a hard drive. Excess files can be cleaned out via the clean-up bin option, although this is best done after everything is made and you want to clean out all those files NOT used in the final product.
Equipment and Set-up Needless to say, there are many possible configurations for this paradigm, depending on space, monetary, and practical issues. Indeed, technically, there are three different modules in this set-up: the stimuli creation module, the running module, and the coding module. Practically, however, stimuli creation and coding are always done on the same set-up (as stimuli creation will only take an afternoon), and, if space and money are at a premium, all three could be combined. This total combination is more problematic, however, because a full schedule of participants leaves very little time for coding. Nonetheless, combining everything may be preferable because keeping these modules separate necessitates the purchase of either one more digital camera or a VCR to play the stimuli.
In the combined set-up, the camera that is hooked to the computer serves as both the stimuli input device and the camera that records and ultimately codes the participants, while a second digital camcorder or standard VCR plays the stimuli. In the separate set-up, one digital camcorder does subject recording, a second digital camcorder or standard VCR plays the stimuli while a third digital camcorder is used purely for coding and as a stimuli input device.
For the basic stimuli creation and coding module, you need a digital video camcorder connected to the computer (running digital origin's EditDV software). Also, if possible, a small video monitor connected to the camcorder is very helpful see what you are doing and coding (although the LCD display that comes on many camcorders may be sufficient).
Conversely, to run the paradigm, you need at least one digital camcorder to record the participant responses and another digital camcorder (or standard VCR) connected to a large video monitor to play the stimuli.
Thus, at minimum, you will need one digital camcorder, one large video monitor (with speakers), one computer, and one VCR as well as the cables necessary to connect these. For a more comfortable set up, you should have at least two digital camcorders (preferably three), a large and a small video monitor, one computer and the cables necessary to connect these. Springing for a storage device (like a CD or DVD burner, ZIP or JAZZ drive) is well worth it: both for data back-up and portability purposes. Be sure that you have at least one 4 to 6 pin FireWire cable for connecting the cameras to the computer, as this is often extra and doesn’t come standard with any of the above items (unlike power cables, video cables and such).
Sample Budgets Low End
1000 Apple iMac
2000 40" Large Screen Display
1200 Two (2) Sony Digital 8 Camcorders
200 One Video Monitor
200 Audio & Video Hardware
400 Cables & Storage (Tapes, Disks, etc.)
------
$5K
High End
4000 Apple G4 Computer and monitor (or 1 iMac for coding and a low end G4)
3000 56" LCD Monitor
1800 Three (3) Sony Digital 8 Camcorders
600 Cinestream for Mac (or Final Cut Pro or Premiere)
200 One Video Monitor
500 Audio & Video Hardware
400 Cables & Storage (Tapes, Disks, etc.)
------
$10.5K
Steps to set-up
That’s it. Simply adjust according to taste and the space requirements of the rooms available. As mentioned, one could take this entire program on the road simply by putting the stimuli on a VHS videotape (connect the VCR directly to the camera via video cables), and playing on the available systems. Record using the camera and then code back at the lab.
Figure 1. The split-screen set-up. *
Figure 2. "Do you see the shoe?" *
Figure 3. New project window. *
Figure 4. The capture window. *
Figure 5. Project window after coding *
Figure 6. Sequencer window after dragging clips. *
Figure 7. EDL window. *
Figure 8. Section of a sample EDL *
Figure 9. Edit DV Program. *
Figure 10. Sequencer Window before Rendering. *
Figure 11. The PIP options box. *
Figure 12. Sequencer window after editing. *